Sunday, December 25, 2011

Happy Birthday, Jesus!

It's my favorite holiday ever!  I love celebrating the birth of our Savior, Jesus!  I'm truly thankful for the best  gift ever; the gift of new life that I have been given.  A life of fullness, peace and hope.  There's just simply nothing better!


"For to us a child is born, to us a son is given, and the government will be on his shoulders. And he will be called Wonderful Counselor, Mighty God, Everlasting Father, Prince of Peace."  Isaiah 9:16 


I'm so blessed to have so many family and friends.  I just wanted to take a moment to wish you all a very Merry Christmas and a fabulous New Year!

Thanks for being such amazing visitors to my blog!  I appreciate you so much and hope you are having an amazing holiday time.

xoxo
Julie

Monday, December 19, 2011

hollywood beauties

I finally bought some albums with sleeves a few weeks ago to hold the massive piles of photos I have sitting in my room.  Anyone?  Ya.  So, I while I was going through them, I found this sweet one that I took of the girls while we were in California.  Won't mention how long ago that was!!  I've been saving this photo cuz it holds so me great memories and I knew I wanted to scrap it some day.  So, I finally did!

hollywood2

Supplies:  Cardstock - Bazzill;  Pattern Paper - Pink Paislee Vintage Vogue (Dress Shop, Taffeta, Tailored Suit); Stickers - American Crafts Thickers, Authentique; Die Cuts - Pink Paislee Vintage Vogue; Paper Rosettes - Pink Paislee Vintage Vogue; Spool Buttons - Pink Paislee Vintage Vogue; Ink - Clearsnap Colorbox Chestnut Roan; Font - Guess What.

If it appears that I might just be dreaming of warmer places right now, you might be right!  Although, there is nothing more beautiful than a sunny December day on the Oregon Coast!

Okay, back to the scheduled programming.  I hope to have a few more festive things to share.  In the mean time, have super terrific day!

Saturday, December 17, 2011

Create your tag!


Stamps Waltzingmouse Fancy Phrases, Quietfire Designs; Fancy Pants Designs St. Nick Pattern Paper; Want2Scrap Pearls; CosmicShimmer Embossing Powder; Clearsnap Colorbox Chestnut Roan Chalk Ink, Top Boss Watermark Ink; My Mind's Eye™ Twine (Lost Collection); Spellbinders Die Templates - Picot Edge Circles, Ironworks Motifs, Holiday Tags,  Foliag

I'm so excited that my brother and his family will be coming down from Canada to join us for Christmas this year.  I feel like now that school is out for the kids, the Christmas holiday time has really begun.  The one thing I 'm a little behind on is wrapping gifts.  Poor kids!  The tree has been up for weeks and I already bought their gifts but I just haven't wrapped them yet.  They probably think they are getting a lump of coal for Christmas!  LOL  Anyhoo...I love to make my gifts extra puuurdy.  That includes a fancy tag!  I gave a little tutorial on the Spellbinders blog if you want to see how I made this one.  I actually created a stamp out of fun foam for this one!

We had a such fun Christmas Party at our house last night.  Because my fudge didn't turn out so well, we had to eat snowmen instead.  They were melting and very, very upset.  


The girls helped me make them and we had such a blast!  These guys each have their own personality!  I first saw them on Pinterest but the original recipe came from here.  What I realized afterward is that in order to make them really look like they're 'puddling' you need to make the cookies very big!  I guess everyone felt so sorry for them because not very many got eaten!  LOL  But we had soooo much food.  Let's just say it's a good thing that we have a middles school party coming up at our house next week because there is a TON of yummy treats left overs!  

Thanks so much for taking time to visit me!  Hope you have a fabulous weekend!

Thursday, December 15, 2011

Counting down the days!


It's hard to believe that 2011 and is already coming to an end!  If you are looking for some handmade gift ideas here is a fun one!  This is a personalized calendar that I made last year for Spellbinders and it was picked up by Northridge for their Create:  Mini Albums Winter issue.


Supplies:  Die Templates:  Spellbinders - Grand Labels Eleven, Ribbon Tags Trio Two, Grommet Tags, Labels Twenty-One, Elegant Posts, Rose Creations, Carnation Creations; Clearsnap Chestnut Roan olorbox Fluid Chalk Ink; WorldWin Cardstock; Teresa Collins Noel Pattern Paper; Jillibean Soup Kraft Cardstock; October Afternoon Alphabet Stickers;  Collage Press Stamps; Zutter Bind-It-All

The girls and I had a great time baking yesterday.  The cookies from my previous post didn't turn out quite how I had imagined and not even close to looking like the professional ones.  But, we made memories!!  


Have a super creative day!


Monday, December 12, 2011

Yum! Time to celebrate!!


Brrrrr!  It's gettin' cold outside!  I love a crackling fire so I don't mind!  We've been enjoying friends over and look forward to an Open House on Friday (the kids last day of school...fun stuff!)  I've been looking through Pinterest to find some yummy recipe and holiday ideas!  If you're looking for ideas on how to decorate your table for a Holiday party, I have instructions up on the Spellbinder blog on how to make this lil' ensemble!

I wanted to share this fun, festive recipe I found and I think I will try for our party.  I think the kids will love it!  I found it on Pinterest but the recipe and photo came from the blog called Baked Perfection. 


Candy Cane Blossoms
recipe from Hershey's


1 bag Hershey;s Kisses brand Candy Cane Kisses
1/2 cup butter, softened
1 cup granulated sugar
1 1/2 teaspoons vanilla extract
1 egg
2 cups all purpose flour
1/4 teaspoon salt
1/4 teaspoon baking soda
2 tablespoons milk
Red and Green colored sugar


Preheat over to 350 degrees Fahrenheit. Remove wrappers from candies (approx. 35)


Beat butter, sugar, vanilla, and egg in large bowl until well blended. Stir together flour, baking soda and salt; add alternatively with milk to butter mixture, beating until well blended.


Shape dough into 1 inch balls. Roll in red and/or green colored sugar. Place on ungreased cookie sheet.


Bake 8 - 1o minutes or until edges are lightly browned and cookies is set. Remove from oven; cool 2 to 3 minutes. Press candy piece into center of each cookie. Remove from cookie sheet to wire rack. Cool completely. Yields approximately 35 cookies.

(Secretly, I might just want to make these because Candy Cane Kisses are my total FAVE....not that I would be doing any taste testing...at all...while making these!)

Have you seen Betty Crocker's Top 10 Holiday Trends??  Oh my!  They have quite an inspiring site! Check it out!    How fun are these????  It not only makes me want to bake but I'm seriously inspired to create now too!


How about you, do you have any favorite holiday recipes that you think I should try?  I'm making my list and checking it twice!!

**Scrapbook Trends Giveaway Winner**  Melita!!  Send me your addy at julieoverby at peak dot org and I'll get that out to you.

Thanks for stopping by!!

Wednesday, December 7, 2011

'Tis The Season!!

I think that somewhere back in the middle of October someone accidentally hit the fast forward button and it got stuck!  I know this sounds cliche but I honestly don't know what happened to November?  Anyone?


I've decided that I want to soak up every moment of this Christmas season.  Savor the smells, read a little more with the kids, look for ways to bless people in need, sittin' by the fire...pinning : ) and spending lots of  time with family and friends.

At the beginning of the month I did get to teach another class at our local scrapbooking store and I surprised everyone taking the class with these fun treat bags.  The Spellbinders Layered Poinsettia die templates and Picot Edge Circles made them so quick and easy to put together.

It's always at this time of year that I'm crafting up a storm with things that I can't share!!  Either with new product or for submissions.  I will tell ya that the few times I have sat down to write a post I get sucked into editing the hundreds of photos that are calling my name!  I LOVE LOVE LOVE to edit photos, nearly as much as taking them.  I promise I won't share them all but it's hard to sort through and pick just a few!

Here is one of my recent faves.  It's of a Newborn photo shoot I recently did.  I haven't even touched the other pictures yet but there were some real fun ones that I can't wait to get to.


Then there are the tree pictures!  Oh my!  LOL  We went to the coolest place to get our tree.  We let the kids and the dog run and run.  It was hilarious to see them trying to run and hide from Max!  It's been so much fun editing them but I think I'll wait and share them on a layout!

Today, I had a happy box arrive on my doorstep from Northridge Media (thank you!)  I have an extra copy.  Are you interested?  LMK!  I'd be happy to send it out to one of my blog readers.  I'll randomly choose someone from the the comments on Sunday, midnight PST.  I have a few scrappy goodies to throw in with it as well!


Thanks so much for not giving up on me!  
Monday, November 28, 2011

Pure Elegance Wrapped Up in a Tiny Package!


Hi friends!  I hope you had an amazing time with your family over the Thanksgiving holiday.  For the first time ever our kids had the entire week off so I didn't spend much time on the 'puter or blogging.  We had a wonderful time with extended family though!

I love small, pretty things.  I especially love small, pretty things that are super quick to make!  Even though it was a busy week, I did get a little creating done and it hardly took me any time at all!  The directions are posted on the Spellbinders Blog.


All I needed to make this gorgeous lil' gift box was Spellbinders Square Bracket Edge Box and Layered Poinsettia, Best Creation Inc, Glitter Paper Cardstock, Scor-Pal® Scor-Tape™ and
SCRAPBOOK ADHESIVE BY 3L™.  

I am thrilled to also let you know that I will be teaching a card class at Paper Mermaids this Saturday!  We will be creating 5 Christmas cards and there will be some fun give-aways as well!  Hope to see some of you locals there!  (And anyone who wants to fly out for a visit.  he he)  

Enjoy your Monday and thanks so much for taking a peek at my creation!  


Tuesday, November 15, 2011

Have you heard the news?

Well, two things actually!  First off, sweet Avery came into the world yesterday morning and greeted her new family! (see post below!) I can't wait to meet her!!  Huge Congrats to the family.

Second of all, Crafters Home and Spellbinders™ Paper Arts are releasing three new die templates this week!!  And it get's better!  We are doing a blog hop so you have some great ideas and chances to win!  


You find out all the information on the Spellbinders Blog. Yesterday, Wavy Rectangles was released and I created this Christmas Bag and Tag set.

Supplies: S4-341 Wavy Rectangles' E8-004 Classic Ric Rac, E8-002 Classic Bracket, S4-293 Lacey Circles, LF-132 Grand Rectangles: Jillibean Soup Christmas Eve Chowder Pattern Paper and stickers; Kraft Tag; My Mind's Eye™ Holly Jolly Pattern Paper; Collage Press Pattern Paper; Lost and Found Trim; SCRAPBOOK ADHESIVES BY 3L™ 3D Foam Squares; Scor-Pal® Scor Tape; Sparkle N' Sprinkle Golden Silver Glitter; Maya Road Trim; May Arts Ribbon 


This post is not a part of the hop but I wanted to make sure you knew about it.  I'd still love to hear what you think!  Isn't this a fun new shape?  Wait until you see what was released today!!  I've been waiting a long time for that one!

Thanks for stopping by and have a super, fabulous day!

Saturday, November 12, 2011

Does it get any cuter than that?

Hi friends!  Today I have some photos of an adorable family that I got to do a photo shoot with a few weeks ago. I love this family so much and they are genuinely beautiful on the inside and out.  Mama is about to have her baby any day!!


Does it get any more adorable than that???  I know, right?  I guess we'll find out when baby number three makes her debut!  I can't wait to take some newborn photos!

Hope you are having a fabulous weekend!  Thanks for poppin' in for the visit!


Sunday, November 6, 2011

JustRite Christmas Link Party


JustRite Stampers is have a Link Party to get us all inspired to start creating our handmade Christmas Cards.  There is already lots of cards to be inspired by and you can see them on the JustRite Blog.


I have a lot of favorite JustRite Christmas stamps but I particularly like this set called Deck the Halls because  they coordinate with the Spellbinders 2010 Heirloom Ornaments AND the 2011 Heirloom Ornaments.


Supplies:  Stamps - JustRite Deck the Halls, Lace Borders; Die templates - Spellbinders 2011 Heirloom Ornaments, Labels Twenty-Two; Cardstock - WorldWin; Pattern paper - My Mind's Eye Holly Jolly, Melissa Frances; Twine - The Twinery; Trim - Melissa Philips; Markers - Copic; Glitter - Sprinkle N Sparkle


After stamping my ornament, I cut/embossed it with  2011 Heirloom Ornaments and then stamped my sentiment in the center.  I love that there is a spot to switch up your choice of sentiment!  Then I used my Copic markers to add just a bit of color to go with soft palette of the paper.  Lastly, I added a bit of glitter because I love to add a bit of sparkle especially on Christmas projects!


Do you make your own Christmas cards?  Have you started yet?  I only have a few done.  I have enjoyed the warm fire with the cold, crisp days.  It's like we went from summer straight to winter here on the coast!

Hope your day is blessed!


Saturday, November 5, 2011

Handmade Holidays Blog Hop!


Welcome to the Handmade Holidays Blog Hop!!

Handmade Holidays Blog Hop 2011 Logo 1000x

Calling all crafters! We've gathered designers from some of our favorite manufacturers to show you ways to create something from the heart this holiday season.

handmade

This 3 day Hop includes over 60 stops with inspiration brimming from every corner. Explore all thoughtful and frugal handmade gifts you could make for the holidays, all in one place on this Hop!


The Goods ---------}  To sweeten the Hop, we’re offering a gift for you! For every comment you leave on the blogs in the Hop, you’ll be entered to win a prize pack from one of the participating manufacturer sponsors!
This is the package that Spellbinders is giving away:  Four Die Template Sets!!!


Spellbinders Prize Package


The Details-----------}  Visit the list of blogs below and leave a comment on each by Nov 7, 2011 at 11:59 PM PST. Each day we will be sharing a brand new list of blogs with brand new projects for you to explore, be inspired by, and create from!


The Designers--------}


collage one

The Supplies------------}
Spellbinders Supplies: S4-340  Create A Flake Three, S5-056 Holly Accents, S4-346 Labels Twenty-Two, S4-114 Standard Circles LG; S4-338 Holiday Tags

Additional Supplies:  Ink – Clearsnap Colorbox Pigment Ink (Silver, Black); Stamps – JustRite What’s Cookin’ Set, StampingScrapping; Cardstock – Bazzill Kraft, WorldWin Black, Jillibean Soup; Bling – Want2Scrap; twine; fabric

Christmas time is a time of giving and I think most people really appreciate handmade gifts, especially when it involves sweets!  I love to decorate jars with yummy ingredients to give away.

The Tutorial---------------}
Reverse Inking:  To create the jar topper , I used Create A Flake Three die templates and placed them on scrap paper.  Then I took my Clearsnap Silver Pigment Ink and covered the surface of the ‘cut side’ of the die templates.  I carefully placed them on my A Base plate and placed white cardstock and Kraft paper on top.  Then I used my Spellbinders Grand Calibur to cut and emboss them. 
(See a Reverse Inking Tutorial Video on this post here.)


IMG_0802 copy

IMG_0823

I used Standard Circles LG to cut a circle out of craft paper that already had white dots on it. Snow!

IMG_0804

After cutting/embossing the circle, I used my Color Box Stylus to ink the inside of the die template.  This stenciling creates a border on the die cut once the template has been removed.

IMG_0832 copy
After filling the jar with ingredients, I cut some fabric for the top, tied twine around it then used foam squares to adhere the Kraft circle.  I also used foam squares to layer my snowflake and apply to the top to give it some dimension.

IMG_0918
Next I cut/embossed a Holiday Tags out of Kraft paper and stenciled the inside with silver ink before removing the die template.  This die template already has a hole punched in the top so it’s ready to add to the twine bow!

To create the Label on the front of the jar, I I cut/embossed Labels Twenty-Two out of black cardstock. Then I took next two sizes down and taped them on to Kraft Paper. Cutting/embossing them together creates a frame which I adhered on to my black label.


IMG_0840 copy

The Design Tip ---------------}

When inking a partial area of a stamp, place tape over the sections that you don’t want to show up.
IMG_0847 copy
I love this JustRite stamp but only the sentiment would fit in the center of my die template so I simply taped off the border before applying ink.  After stamping on white cardstock, I cut/embossed it using Holly Accents.  I didn’t want to include the Holly’s on this die cut so I snipped them off and was left with a cool label to go inside my Labels Twenty-Two. 

IMG_0864
I created my card using all the same steps.  I layered my cardstock and before adhering my labels and snowflake, I cut/embossed Holly Accents and trimmed it so that I had just the pieces I wanted showing out the side.  Then I stamped my sentiment and added the layers of labels and snowflake.  I added a small bit of bling in the center to embellish it.

IMG_0894
I hope you have some new ideas and techniques and have been inspired to make some Handmade Holiday gifts.
IMG_0925
Enjoy the hop and Merry Christmas!

Friday, November 4, 2011

Thanks for Everything

I didn’t want any of my blog readers to miss out on a most fantastic and HUGE hop with many different companies!  My projects will be in the hop tomorrow but it’s starts today!  Check out the Spellbinders Blog for details!

Thanks-for-Everything2

Cardstock – Papertrey Ink; Pattern Paper – My Mind’s Eye (Lush); Die Template – Spellbinders (Labels Eighteen); Stamp – Gina K Designs (Springtime Silhouettes); Trim – Prima Marketing; Pearls – Want2Scrap

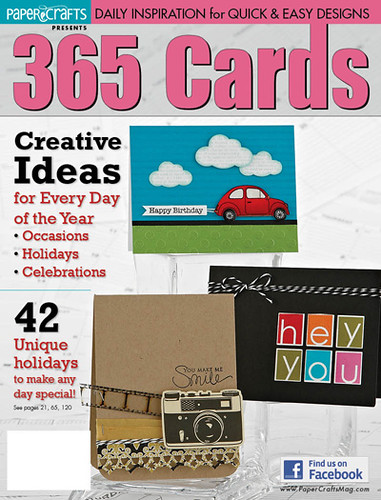
This card arrived in the mail along with this special issue….

6290028136 24c6cb4bcd Countdown to 365 Cards Week!

If you haven’t got a chance to pick up a copy and peek at it, you are in for a treat when you do!  Sooooo much inspiration!  I’m thinking the Paper Crafts Magazine Blog will also be having some more sneak peeks!

Thanks for stopping by!  Come back tomorrow to see what I created for the big Holiday Hop!

LinkWithin

Related Posts with Thumbnails